Search for answers or browse our knowledge base.
-
Getting Started
-
FAQs
- Botox FAQ
- Roles & Responsibilities
- Nutrition For Oral Health
- Weekly Reports
- Weekly Report Text Reminder
- Upset Patient Protocol
- Informed Consent for Appointment Confrimation
- Dr. Bracci Scheduling Guidelines
- Implant Bundle Flyers
- Prophylactic Pre-Med Guidelines
- Protocol for Cardiac Patients
- Protocol for Pregnant Patients
- Loupes and Lights!
- Core Values – Printable!
- Victor Smiles
- IO Molecular Iodine Mouthwash FAQ
- CE Requirements for staff
- Revenue Cycle Workflow Steps
- Back to The Basics Weekly Messages
- VIP Guidelines – Patients Presenting Insurance During a VIP Term
- Traditional Denture Updated Option 1 Replacement Teeth Poster
- Medical Emergency Training
- Ortho Triage Cheat Sheet
- iTero Lumina Scanner Guides & Workflows
- How to change a prophy patient to perio
- Show Remaining Articles (10) Collapse Articles
-
Open Dental
- Open Dental Tasks
- Moving X-Rays Between Patients in Apteryx
- How to print Chart Notes in Open Dental
- FLDC Calibration Document!
- Setting Orthodontic Time Frame in Open Dental
- Flex Online Scheduling Setup
- IO Camera Capture Button Doesn't Work?
- How to Enter a Pre-Determination into Open Dental
- Open Dental Scanner Settings
- Email CT's from Apteryx
- XVCapture (Apteryx) Forward Images Failure
- Removing Medications from a Chart
- Can only see 1 xray/image taken in Apteryx/XVWeb?
- Income Transfers in Open Dental
- Open Dental Popups!
- How To Update Info on Patients X-Rays to Match Open Dental
- Show Remaining Articles (1) Collapse Articles
-
HR
- Prenatal Leave (Prenatal PTO)
- Handbooks!
- HR Duties
- Needlestick Protocol
- Team Member Dental Appointment/Insurance Protocol
- Team Member Referral Bonus!
- Exposure Incident
- Ascensus Retirement
- Mileage Reimbursement
- Time Off Requests
- Loupes and Lights!
- Core Values – Printable!
- Assisted Tiered Sheet
- Taxes and working in Multiple Locations
- Incentive Pay
- Maternity Leave Policy and Benefits
- HSA Contribution Form 2025
- Job Shadow Emergency Contact
- Full Time vs Part Time Benefit Info
- CE Requirements for staff
- Paycor Registration Instruction
- New Team Member Training – Hands On!
- Show Remaining Articles (7) Collapse Articles
-
Procedures
- Take Home Whitening: Team Instructions
- Discipline Documentation Protocol
- Submitting an IT ticket
- Hygiene Laser Bacterial Reduction
- Whitening Options & Team Information
- Fluoride Trays
- Fluoride Varnish After Care Instructions
- Implant Overdenture & Fixed Implant Bridge Recall Protocols
- FLDC Calibration Document!
- Implant Appointment Cheat Sheet
- POST OPS
- How to update Fees in a Patient Treatment Plan
- FLDC Lab Dentures
- Silver Diamine Fluoride (SDF) Application
- Victor Smiles
- Implant Returns
- Sedation
- Mandated Reporter
- Meeting Agenda Format
- Patient Photo Protocol
- Back to The Basics Weekly Messages
- Traditional Denture Updated Option 1 Replacement Teeth Poster
- Medical Emergency Training
- Naples Emergency Plan
- SOP for VA Patients
- Clinical Management of Incipient Caries Lesions
- All FLDC Lab Information
- Show Remaining Articles (12) Collapse Articles
-
Lab
-
Hygiene
- Hygiene Laser Bacterial Reduction
- Appliances Scanned for in Hyg vs Doc Side
- Ideal Flow of a Recall Appointment
- Schedule Preperation
- How to See Clear Images with Jazz Sensors
- Laser Treatments Post Op Instructions
- Salivary Testing
- Hygiene Recall System
- Implant Overdenture & Fixed Implant Bridge Recall Protocols
- Saving Microscope Video to Open Dental
- Hygienist EOD Checklist
- Nonsurgical Perio Therapy Post Op Instructions
- How to take a CT Scan
- Air Polisher
- Channel D
- Gingival Therapy Refusal
- FLDC Calibration Document!
- Clinical Attachment Loss, Calculation
- Taking an IO Photo in Apteryx
- How to Check Your Adjusted Production
- Patient Refusal
- Gingival Therapy Handout
- WATERPIK
- REQUEST TO RESTRICT DISCLOSURE OF INFORMATION
- Alternative to Fluoride
- FYGG Hydroxyapatite Pt Info
- Blood Pressure Protocol
- PH of our Saliva
- Implant retained overdenture
- Perio Protocol Cheat sheet
- How to Take a CT
- Daily Patient Planner
- Pain Protocol
- POST OPS
- Hygiene Rec Sheet
- Tips for Hygienists
- Silver Diamine Fluoride (SDF) Application
- Hygiene Appointment Blocks
- Super Seal
- IO Molecular Iodine Mouthwash FAQ
- Hygiene Product Rec Sheet
- Incentive Pay
- CE Requirements for staff
- Non Surgical Periodontal Therapy Explained
- Periodontal Maintenance Explained
- WaterPik Instructions
- Consults/NPE/Limited Chart
- Itero Protocol
- Understanding Gum Disease
- Patient Caries risk assessment
- Curodont Application Instructions
- Clinical Management of Incipient Caries Lesions
- Perio Dx sheet for pt when they defer treatment
- Prevident Labels
- Protocol for Hygiene Block Scheduling
- Show Remaining Articles (40) Collapse Articles
-
Front Desk
- How to Delete and Document a Failed Appointment
- How to Document and Reschedule a Short Notice Cancellation
- How to Change Doctor On Call in Mango
- Adding the VIP Savings Plan to a Patient Account
- Hygiene Recall System
- Review Follow up Email
- End of Year Insurance Benefits Remaining
- How to Merge Patients in Open Dental
- How to Import X-Rays from Outside Offices into Apteryx
- Phone Extensions
- Pink Sheet
- Financial Policy
- HIPPA Consent
- Welcome!!
- Updating Voicemail & Holiday (time off) Hours
- School Trauma Form
- TC Info to Review with Sedation Patients
- REQUEST TO RESTRICT DISCLOSURE OF INFORMATION
- Letter to PCP to Evaluate Patient for Reflux
- Implant Bundle Flyers
- How to add a GA Appointment @ Victor Smiles
- Release of Records
- Back of Router
- Blood Pressure Protocol
- End of Day (FD)
- Denture/Implant Bundles
- Consent for Treatment Not Covered by Insurance
- Appointment Confirmation & Cancellation Protocol
- How to Check Clinical Notes
- Billing & Statements
- ASTGW
- Pain Protocol
- Tx Coordinator Training with Kiera
- Medical Clearance – PCP
- Setting Orthodontic Time Frame in Open Dental
- TMJ
- X-Ray SOP
- Flex Online Scheduling Setup
- How to Enter a Pre-Determination into Open Dental
- Consent Forms
- Hygiene Appointment Blocks
- Implant Returns
- Excuse Note
- Bracci TC Forms
- CA – Admin Flow Chart
- Change Request Form
- Meeting Agenda Format
- CE Requirements for staff
- Revenue Cycle Workflow Steps
- Pediatrics Pink Slip
- Consults/NPE/Limited Chart
- Dr. Bracci Referral Form
- Victor Smiles Peds Referral
- ASTGW Peds Referral
- VIP Guidelines – Patients Presenting Insurance During a VIP Term
- Traditional Denture Updated Option 1 Replacement Teeth Poster
- 2-2-2 Follow Up Tracker
- Adding New Patient Referral Sources to Open Dental
- Doctors Approved for CDF Financing
- In Network Insurance List
- Office Fees
- Prevident Labels
- Cancer Bags
- Handwritten Letter Protocol
- Router – ASTGW
- Victor Smiles ORTHO Referral Pads
- Implant Return Form
- Protocol for Hygiene Block Scheduling
- Fixed Bridge Agreement
- Digital Denture Patient Home Care Instructions
- End of Day Cover Sheet
- Dry Mouth, Cancer Bag
- Show Remaining Articles (57) Collapse Articles
-
Assistants
- Schedule Preperation
- How to See Clear Images with Jazz Sensors
- How to take a CT Scan
- FLDC Calibration Document!
- POST OPS
- Implant Bundle Flyers
- Blood Pressure Protocol
- Orthodontic Charting
- Sedation Drug Log Book
- FLDC Lab Dentures
- How to Take a CT
- Pain Protocol
- TMJ
- Assisted Tiered Sheet
- Implant Returns
- Sedation
- Seazona
- CE Requirements for staff
- Consults/NPE/Limited Chart
- Patient Photo Protocol
- Dental Office Cleaning & Maintenance Checklists
- iTero Lumina Scanner Guides & Workflows
- Show Remaining Articles (7) Collapse Articles
-
Doctor
- Failed Dentistry
- How to See Clear Images with Jazz Sensors
- FLDC Doctor On Call Schedule
- Medical Clearance – Bracci
- How to take a CT Scan
- FLDC Calibration Document!
- How to Check Your Adjusted Production
- Implant Returns
- Sedation
- Seazona
- CE Requirements for staff
- Consults/NPE/Limited Chart
- Dr. Kami Referral Form
- Doctor CE reimbursement form
- Handwritten Letter Protocol
- Canandaigua Payment Contract
- Show Remaining Articles (1) Collapse Articles
-
Other
-
Insurance
- Patient Information Needed for Insurance Breakdown
- School Trauma Form
- Billing & Statements
- Insurance Claim – Auto Injury & Workers Comp
- X-Ray SOP
- How to Enter a Pre-Determination into Open Dental
- VA Insurance Patients FAQ
- Revenue Cycle Workflow Steps
- VIP Guidelines – Patients Presenting Insurance During a VIP Term
- In Network Insurance List
-
Information Technology
-
Ortho
Orthodontic Charting
This will guide you through the steps to adding orthodontic treatment to the tooth chart in Open Dental!
Added Braces to Open Dental Charting
1. Click ‘Chart’

2. Click ‘Ortho’ tab

3. Click "Prescriptions"

4. Choose what you want to add to this chart – in this example we are adding brackets that are being done in an office outside of FLDC, VS, ASTGW.

5. We will highlight and select the brackets and wire by holding down the control key on the keyboard.

6. Adding the lower wire as well by holding down the control key on the keyboard.

7. Click "Select"

8. Click "OK"
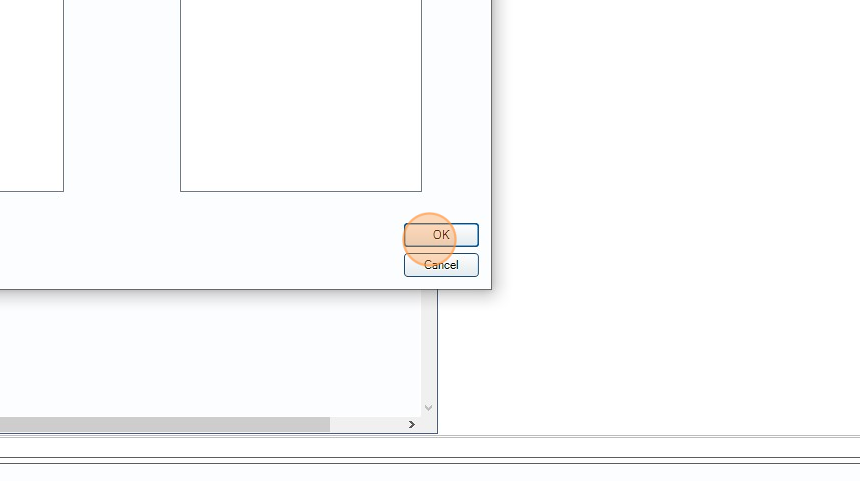
9. The chart now shows the brackets and wires!

Tip: When adding brackets from an outside office they will show in green like existing other treatment.
Brackets being done in house will be silver or gold.
Invisalign/Clear Aligners will show as white brackets – do NOT add the wires here!
For in house treatment you can also add in the elastics and where the patient should be wearing them! This is located in the ‘Prescriptions’ button – or can be added using the ‘Add Single’ button.
10. When brackets are removed you will highlight all hardware in the chart – right click in the highlighted area and click ‘Delete’
